Monday, April 20, 2015
Nokia Asha 303 Mic Not Working Problem Solution Jumpers
 If you are facing mic problem low voice or not voice out going to destination then this diagram will help you to solve mice problem in nokia asha 303. In diagram bellw you can see a mic that is defined with red boarder and some parts are also defined with red line boarder.All cellular mobile repair solution here Nokia 2320 Classic Ringer Problem Jumper Ways Solution
So we have to check all these parts that are in red board to solve mic problem and mic not working problem in nokia asha 300.check mother board vary carefully if there is any rust carbon or water damage issue. Clean mother board form these areas and apply some heat with hot air so that mother board of nokia asha 303 can be dry.
If with only service it can not be solved change mic and you can remove mic with hot air or solding iron. In nokia asha 300 mic has 4 points itself and one is ground other are data clock points. so we can apply jumpers in these point.
for more detail and new tips and tricks about cellphone service problem keep visiting this page we will update cellphone service diagrams timely with new cellphone diagrams.some related post are also given bellow you can read them also for more information about cellphone.
Sunday, April 19, 2015
Nokia X5 Solution USB Not charging problem issues solution
Heres the solution that may help fix or repair Nokia X5 USB charging problem. When the device shows no charging indication when the battery charger is plug-in, the components showed on the solution below such as the chip fuse and a diode might possibly damaged.This solution shows the location of the components that needs to check or then replace if found damaged.

Repair hints:
Check the USB pin connector and ensure that it is free from dirt or oxidation, clean or replace it if necessary.
Check the chip fuse if open, replace if damaged
Check the diode if shorted, replaced if damaged
If the fuse and the diode is okay but the charging problem still exists proceed to rework or replace the USB charger voltage controller IC, it is located at the rear side of the PCB board.
Nokia X5 USB Charging No Response solution
Repair hints:
Check the USB pin connector and ensure that it is free from dirt or oxidation, clean or replace it if necessary.
Check the chip fuse if open, replace if damaged
Check the diode if shorted, replaced if damaged
If the fuse and the diode is okay but the charging problem still exists proceed to rework or replace the USB charger voltage controller IC, it is located at the rear side of the PCB board.
Nokia 5250 Key Pad Lock is Not Working
keypad lock is used for security reasons in nokia 5250.if it is not working in phone you ill not be able to use phone keys.it can be due to water damage carbon or rust.so if you have keypad problem in nokia 5250 look at diagram bellow and check these parts.Nokia C2-03 Lcd Display Problem Solution Ways Jumpers

in above diagram you can see green and red lines these are tracks of keypad lock button.green color point is indicating ground prints while red is a positive point.you can check these points and parts if track is missing apply jumpers as shown in above diagram.if track is ok then replace keypad lock button to solve this issue in nokia 5250.
for more detail and new tips and tricks about cellphone service problem keep visiting this page we will update cellphone service diagrams timely with new cellphone diagrams.some related post are also given bellow you can read them also for more information about cellphone.
Read more »
in above diagram you can see green and red lines these are tracks of keypad lock button.green color point is indicating ground prints while red is a positive point.you can check these points and parts if track is missing apply jumpers as shown in above diagram.if track is ok then replace keypad lock button to solve this issue in nokia 5250.
for more detail and new tips and tricks about cellphone service problem keep visiting this page we will update cellphone service diagrams timely with new cellphone diagrams.some related post are also given bellow you can read them also for more information about cellphone.
Nokia C2 07 Insert sim ways problem solution jumpers
Nokia C2-07 insert sim problem, Sim is not working in Nokia C2-07, Sim is not Valid, Single Sim is not working in Nokia C2-07
Tools:-
Nokia T4 and T5 key, Electronic meter, Electronics Cleaner, Hot Air, Solding Iron, Jumper Wire.
Nokia 5800 battery terminal jumpers solution

Diagnostic and Solutions.
if sim is not working in Nokia C2-07 is can be cause of water damage or missing components. Use different sim and if sim is not working then de assemble Nokia C2-07.
Once Mobile phone is disassemble check all these parts that are given in above diagram and apply electronics cleaner. Apply hot air so that it can be dry but not to much because it can damage the mother board or may can harm your skin.
these different color lines are indicating different path and tracks that are used in sim function in Nokia C2-07 so if nay of them is missing apply that jumper as shown in diagram to solve insert sim problem in Nokia C2-07
If single sim is not working out of these two you can only jumper those parts that are used by it. And to find prints and track you can see above diagram.
Warnings:
Do not apply to much heat it can damage the mother board and harm your skin.
When apply jumpers make sure the do not be ground with other prints.It can short the mobile phone.
Remove Sim Ic with hot air because with Solding iron it might can damage prints also.
for more detail and new tips and tricks about cellphone service problem keep visiting this page we will update cellphone service diagrams timely with new cellphone diagrams.some related post are also given bellow you can read them also for more information about cellphone.
Tools:-
Nokia T4 and T5 key, Electronic meter, Electronics Cleaner, Hot Air, Solding Iron, Jumper Wire.
Nokia 5800 battery terminal jumpers solution
Diagnostic and Solutions.
if sim is not working in Nokia C2-07 is can be cause of water damage or missing components. Use different sim and if sim is not working then de assemble Nokia C2-07.
Once Mobile phone is disassemble check all these parts that are given in above diagram and apply electronics cleaner. Apply hot air so that it can be dry but not to much because it can damage the mother board or may can harm your skin.
these different color lines are indicating different path and tracks that are used in sim function in Nokia C2-07 so if nay of them is missing apply that jumper as shown in diagram to solve insert sim problem in Nokia C2-07
If single sim is not working out of these two you can only jumper those parts that are used by it. And to find prints and track you can see above diagram.
Warnings:
Do not apply to much heat it can damage the mother board and harm your skin.
When apply jumpers make sure the do not be ground with other prints.It can short the mobile phone.
Remove Sim Ic with hot air because with Solding iron it might can damage prints also.
for more detail and new tips and tricks about cellphone service problem keep visiting this page we will update cellphone service diagrams timely with new cellphone diagrams.some related post are also given bellow you can read them also for more information about cellphone.
Nokia 5130 Headset in Activated Mode even the headset is not Plugin in solution
This is the solution for a wet damaged Nokia 5130 that the headset enhancement mode activated even the headset device is no being plug-in.
If you ever encounter this problem like a wet damaged nokia 5130 this is cause by a faulty headsets detection circuit. This trouble occurred if the components showed on the solution below were damaged or caused by oxidation and molds build up.

The highlighted components showed on the solution above which is hold for headset detection, this circuit works as to tell the application processor when the headset device is being plug-in. Now if this said components went wrong and become damaged, this will cause also the device to activate the headset even without the headset being connected or plug-in. I was once encounter this problem, I just replace all of the components showed on the solution above for which I found out that oxidation has been building up on that components and then the Nokia 5130 always shows in headset activated mode situation .
Read more »
If you ever encounter this problem like a wet damaged nokia 5130 this is cause by a faulty headsets detection circuit. This trouble occurred if the components showed on the solution below were damaged or caused by oxidation and molds build up.
Nokia 5130 Headset Activated Mode Problem Solution
Saturday, April 18, 2015
Nokia Asha 203 Usb Not Charging Problem Solution Jumper Ways
nokia sha 203 is not charging with usb or usb can not be detected it can be cause of water damages. Carbon in usb base. Broken or damage parts and may be due to burn components.To solve usb not charging in nokia asha 203 you can read this post which also contains a usb not charging repairing diagram for nokia asha 203.nokia Asha 203 Mic problem solution jumper ways

In above diagram you can see Red, Blue & Black lines these are used in usb charging and usb data functions. Check USB charging jack if it have some carbon or rust then clean it with CTC and apply heat to make it Dry.
If USB charging jack of nokia asha 203 is damage or Replace it. If a few pins are missing then check all these tracks that are given in above Nokia asha 203 usb not charging diagram. If any print out of these is missing apply jumpers.
Check all these parts and if any of them is broken or damage apply jumpers. If jumpers can not solve usb data & charging problem of nokia asha 203 then replace these parts.
for more detail and new tips and tricks about cellphone service problem keep visiting this page we will update cellphone service diagrams timely with new cellphone diagrams.some related post are also given bellow you can read them also for more information about cellphone.
Nokia 2330 Classic Bluetooth and FM Not working Problem Solution
Nokia 2330 Classic Bluetooth is used for data transfer between devices with Bluetooth.In Nokia 2330 Classic Bluetooth can be damage or not working due to water damages and rust.It can be fault for shortage and burned parts.Nokia C2-01 Keypad is Not Working Problem Solution
In above diagram you can see some parts that are in lined with red color. Clean these parts after disassemble with electronics cleaner and then apply some hot air so that it can be dry.Do not apply much air with hot air station because it can harm your skin or may can damage the mother board of Nokia 2330 Classic.
These parts are also used in FM function so if FM Radio is not working in Nokia 2330 Classic you can also re flow and resold these parts that are identify in the above diagram.
for more detail and new tips and tricks about cellphone service problem keep visiting this page we will update cellphone service diagrams timely with new cellphone diagrams.some related post are also given bellow you can read them also for more information about cellphone.
Nokia X6 No LCD backlight LED Dark black LCD screen display solution
Dark black LCD Screen Displays Nokia X6 is caused by the LCDs illuminating backlight LEDs failure to light up on the back of the display screen. If this happens you may need to try to replace a new LCD display module replacement on it. If happens that the problem still persists you may then check this corresponding components showed on the solution below.
 The solution above showed the LCD display backlight LED driver circuit of Nokia X6 PCB board.
You need to check, trace, replace particular components highlighted on the solution above and follow some simple procedures indicated.
Nokia X6 LCD screen display backlight LED failure solution
You need to check, trace, replace particular components highlighted on the solution above and follow some simple procedures indicated.
Friday, April 17, 2015
Nokia 2320 Classic Bluetooth and FM Not working Problem Solution
 Nokia 2320 Classic Bluetooth is used for data transfer between devices with Bluetooth.In Nokia 2320 Classic Bluetooth can be damage or not working due to water damages and rust.It can be fault for shortage and burned parts Nokia 2320 Classic Insert sim problem solution ways jumper see all cellular mobile repairing solutionIn above diagram you can see some parts that are in lined with red color. Clean these parts after disassemble with electronics cleaner and then apply some hot air so that it can be dry.Do not apply much air with hot air station because it can harm your skin or may can damage the mother board of Nokia 2320 Classic.
These parts are also used in FM function so if FM Radio is not working in Nokia 2320 Classic you can also re flow and resold these parts that are identify in the above diagram.
for more detail and new tips and tricks about cellphone service problem keep visiting this page we will update cellphone service diagrams timely with new cellphone diagrams.some related post are also given bellow you can read them also for more information about cellphone.
Nokia Lumia 800 Restore Factory Hard Reset Format Phone
If you have Nokia Lumia 800 problems and want to restore the smartphone then this post will help you to fix cellphone software problems. Due to software problem smartphone can hang, voice issues, data damages, camera stand by and blue tooth and wifi problems.
It will remove all the data ,contacts and apps that you installed
In touch screen mobiles it can be software problem also if touch is not working well.To solve these problems try the following steps.
nokia Asha 200 Camera Problem Solution Jumper Ways
Charge mobile phone battery, Make backup of your impotent contacts data and media files if possible and in most cases take out SIM and SD card.
After reset of Nokia Lumia 800 you will lose all the data and it will be impossible to get it back.so online backup is always important. Try to save all your data, backup on external device or hard drive.
So lets start the Nokia Lumia 800 Restore Factory, Nokia Lumia 800 Hard Reset.
Turn Off the mobile phone for few mints.
Make it Power On
Turn off your Nokia Lumia 800. Press and hold the following buttons Camera + Volume down + Power until your phone vibrates, then release only the Power key and keep pressing the Camera + Volume down for a couple of seconds 4-5s.
On the Start screen,
Tap Settings > about phone.
Tap reset your phone, and then tap yes.
The factory setting for the lock code is 12345
Read more »
It will remove all the data ,contacts and apps that you installed
In touch screen mobiles it can be software problem also if touch is not working well.To solve these problems try the following steps.
nokia Asha 200 Camera Problem Solution Jumper Ways
Charge mobile phone battery, Make backup of your impotent contacts data and media files if possible and in most cases take out SIM and SD card.
After reset of Nokia Lumia 800 you will lose all the data and it will be impossible to get it back.so online backup is always important. Try to save all your data, backup on external device or hard drive.
So lets start the Nokia Lumia 800 Restore Factory, Nokia Lumia 800 Hard Reset.
Turn Off the mobile phone for few mints.
Make it Power On
Turn off your Nokia Lumia 800. Press and hold the following buttons Camera + Volume down + Power until your phone vibrates, then release only the Power key and keep pressing the Camera + Volume down for a couple of seconds 4-5s.
On the Start screen,
Tap Settings > about phone.
Tap reset your phone, and then tap yes.
The factory setting for the lock code is 12345
iPhone 5c iPhone 5s 7 0 5 Update and Latest Firmware Update Here See And Download Now
Below you can find the direct links to the iPhone 5c / iPhone 5s ios 7.0.5 Update and Latest Firmware Files for every released firmware version.
Please note that if you use Safari you must disable the auto unzip feature.
It may be easier to just use Firefox!
Offline NokiaFirm Version-7.0 Released Download Now
Latest Firmware iPhone 5c/ iPhone 5s
7.0.5 (5c GSM+CDMA): iPhone5,4_7.0.5_11B601_Restore.ipsw
7.0.5 (5s GSM+CDMA): iPhone6,2_7.0.5_11B601_Restore.ipsw
Full List iPhones all Model Firmware
1.0.0: iPhone1,1_1.0_1A543a_Restore.ipsw
1.0.1: iPhone1,1_1.0.1_1C25_Restore.ipsw
1.0.2: iPhone1,1_1.0.2_1C28_Restore.ipsw
1.1.1: iPhone1,1_1.1.1_3A109a_Restore.ipsw
1.1.2: iPhone1,1_1.1.2_3B48b_Restore.ipsw
1.1.3: iPhone1,1_1.1.3_4A93_Restore.ipsw
1.1.4: iPhone1,1_1.1.4_4A102_Restore.ipsw
2.0.0 (2G): iPhone1,1_2.0_5A347_Restore.ipsw
2.0.0 (3G): iPhone1,2_2.0_5A347_Restore.ipsw
2.0.1 (2G): iPhone1,1_2.0.1_5B108_Restore.ipsw
2.0.1 (3G): iPhone1,2_2.0.1_5B108_Restore.ipsw
2.0.2 (2G): iPhone1,1_2.0.2_5C1_Restore.ipsw
2.0.2 (3G): iPhone1,2_2.0.2_5C1_Restore.ipsw
2.1.0 (2G): iPhone1,1_2.1_5F136_Restore.ipsw
2.1.0 (3G): iPhone1,2_2.1_5F136_Restore.ipsw
2.2.0 (2G): iPhone1,1_2.2_5G77_Restore.ipsw
2.2.0 (3G): iPhone1,2_2.2_5G77_Restore.ipsw
2.2.1 (2G): iPhone1,1_2.2.1_5H1_Restore.ipsw
2.2.1 (3G): iPhone1,2_2.2.1_5H11_Restore.ipsw
3.0.0 (2G): iPhone1,1_3.0_7A341_Restore.ipsw
3.0.0 (3G): iPhone1,2_3.0_7A341_Restore.ipsw
3.0.0 (3GS): iPhone2,1_3.0_7A341_Restore.ipsw
3.0.1 (2G): iPhone1,1_3.0.1_7A400_Restore.ipsw
3.0.1 (3G): iPhone1,2_3.0.1_7A400_Restore.ipsw
3.0.1 (3GS): iPhone2,1_3.0.1_7A400_Restore.ipsw
3.1.0 (2G): iPhone1,1_3.1_7C144_Restore.ipsw
3.1.0 (3G): iPhone1,2_3.1_7C144_Restore.ipsw
3.1.0 (3GS): iPhone2,1_3.1_7C144_Restore.ipsw
3.1.2 (2G): iPhone1,1_3.1.2_7D11_Restore.ipsw
3.1.2 (3G): iPhone1,2_3.1.2_7D11_Restore.ipsw
3.1.2 (3GS): iPhone2,1_3.1.2_7D11_Restore.ipsw
3.1.3 (2G): iPhone1,1_3.1.3_7E18_Restore.ipsw
3.1.3 (3G): iPhone1,2_3.1.3_7E18_Restore.ipsw
3.1.3 (3GS): iPhone2,1_3.1.3_7E18_Restore.ipsw
4.0.0 (3G): iPhone1,2_4.0_8A293_Restore.ipsw
4.0.0 (3GS): iPhone2,1_4.0_8A293_Restore.ipsw
4.0.0 (4): iPhone3,1_4.0_8A293_Restore.ipsw
4.0.1 (3G): iPhone1,2_4.0.1_8A306_Restore.ipsw
4.0.1 (3GS): iPhone2,1_4.0.1_8A306_Restore.ipsw
4.0.1 (4): iPhone3,1_4.0.1_8A306_Restore.ipsw
4.0.2 (3G): iPhone1,2_4.0.2_8A400_Restore.ipsw
4.0.2 (3GS): iPhone2,1_4.0.2_8A400_Restore.ipsw
4.0.2 (4): iPhone3,1_4.0.2_8A400_Restore.ipsw
4.1.0 (3G): iPhone1,2_4.1_8B117_Restore.ipsw
4.1.0 (3GS): iPhone2,1_4.1_8B117_Restore.ipsw
4.1.0 (4): iPhone3,1_4.1_8B117_Restore.ipsw
4.2.1 (3G): iPhone1,2_4.2.1_8C148_Restore.ipsw
4.2.1 (3GS): iPhone2,1_4.2.1_8C148a_Restore.ipsw
4.2.1 (4): iPhone3,1_4.2.1_8C148_Restore.ipsw
4.2.6 (4 CDMA): iPhone3,3_4.2.10_8E600_Restore.ipsw
4.3.0 (3GS): iPhone2,1_4.3_8F190_Restore.ipsw
4.3.0 (4 GSM): iPhone3,1_4.3_8F190_Restore.ipsw
4.3.1 (3GS): iPhone2,1_4.3.1_8G4_Restore.ipsw
4.3.1 (4 GSM): iPhone3,1_4.3.1_8G4_Restore.ipsw
4.3.2 (3GS): iPhone2,1_4.3.2_8H7_Restore.ipsw
4.3.2 (4 GSM): iPhone3,1_4.3.2_8H7_Restore.ipsw
4.2.7 (4 CDMA): iPhone3,3_4.2.7_8E303_Restore.ipsw
4.2.8 (4 CDMA): iPhone3,3_4.2.8_8E401_Restore.ipsw
4.3.3 (3GS): iPhone2,1_4.3.3_8J2_Restore.ipsw
4.3.3 (4 GSM): iPhone3,1_4.3.3_8J2_Restore.ipsw
4.2.9 (4 CDMA): iPhone3,3_4.2.9_8E501_Restore.ipsw
4.3.4 (3GS): iPhone2,1_4.3.4_8K2_Restore.ipsw
4.3.4 (4 GSM): iPhone3,1_4.3.4_8K2_Restore.ipsw
4.2.10 (4 CDMA): iPhone3,3_4.2.10_8E600_Restore.ipsw
4.3.5 (3GS): iPhone2,1_4.3.5_8L1_Restore.ipsw
4.3.5 (4 GSM): iPhone3,1_4.3.5_8L1_Restore.ipsw
5.0 (3GS): iPhone2,1_5.0_9A334_Restore.ipsw
5.0 (4 GSM): iPhone3,1_5.0_9A334_Restore.ipsw
5.0 (4 CDMA): iPhone3,3_5.0_9A334_Restore.ipsw
5.0 (4S): iPhone4,1_5.0_9A334_Restore.ipsw
5.0.1 (3GS): iPhone2,1_5.0.1_9A405_Restore.ipsw
5.0.1 (4 GSM): iPhone3,1_5.0.1_9A405_Restore.ipsw
5.0.1 (4 CDMA): iPhone3,3_5.0.1_9A405_Restore.ipsw
5.0.1 (4S): iPhone4,1_5.0.1_9A405_Restore.ipsw
5.0.1 (4S) [9A406]: iPhone4,1_5.0.1_9A406_Restore.ipsw
5.1.0 (3GS): iPhone2,1_5.1_9B176_Restore.ipsw
5.1.0 (4 GSM): iPhone3,1_5.1_9B176_Restore.ipsw
5.1.0 (4 CDMA): iPhone3,3_5.1_9B176_Restore.ipsw
5.1.0 (4S): iPhone4,1_5.1_9B179_Restore.ipsw
5.1.1 (3GS): iPhone2,1_5.1.1_9B206_Restore.ipsw
5.1.1 (4 GSM): iPhone3,1_5.1.1_9B206_Restore.ipsw
5.1.1 (4 GSM Build 9B208): iPhone3,1_5.1.1_9B208_Restore.ipsw
5.1.1 (4 CDMA): iPhone3,3_5.1.1_9B206_Restore.ipsw
5.1.1 (4S): iPhone4,1_5.1.1_9B206_Restore.ipsw
6.0.0 (3GS): iPhone2,1_6.0_10A403_Restore.ipsw
6.0.0 (4 GSM): iPhone3,1_6.0_10A403_Restore.ipsw
6.0.0 (4): iPhone3,2_6.0_10A403_Restore.ipsw
6.0.0 (4 CDMA): iPhone3,3_6.0_10A403_Restore.ipsw
6.0.0 (4S): iPhone4,1_6.0_10A403_Restore.ipsw
6.0.0 (5 GSM): iPhone5,1_6.0_10A405_Restore.ipsw
6.0.0 (5 GSM+CDMA): iPhone5,2_6.0_10A405_Restore.ipsw
6.0.1 (3GS): iPhone2,1_6.0.1_10A523_Restore.ipsw
6.0.1 (4 GSM): iPhone3,1_6.0.1_10A523_Restore.ipsw
6.0.1 (4): iPhone3,2_6.0.1_10A523_Restore.ipsw
6.0.1 (4 CDMA): iPhone3,3_6.0.1_10A523_Restore.ipsw
6.0.1 (4S): iPhone4,1_6.0.1_10A523_Restore.ipsw
6.0.1 (5 GSM): iPhone5,1_6.0.1_10A525_Restore.ipsw
6.0.1 (5 GSM+CDMA): iPhone5,2_6.0.1_10A525_Restore.ipsw
6.0.2 (5 GSM): iPhone5,1_6.0.2_10A551_Restore.ipsw
6.0.2 (5 GSM+CDMA): iPhone5,2_6.0.2_10A551_Restore.ipsw
6.1.0 (3GS): iPhone2,1_6.1_10B141_Restore.ipsw
6.1.0 (4 GSM): iPhone3,1_6.1_10B144_Restore.ipsw
6.1.0 (4): iPhone3,2_6.1_10B144_Restore.ipsw
6.1.0 (4 CDMA): iPhone3,3_6.1_10B141_Restore.ipsw
6.1.0 (4S): iPhone4,1_6.1_10B142_Restore.ipsw
6.1.0 (5 GSM): iPhone5,1_6.1_10B143_Restore.ipsw
6.1.0 (5 GSM+CDMA): iPhone5,2_6.1_10B143_Restore.ipsw
6.1.1 (4S): iPhone4,1_6.1.1_10B145_Restore.ipsw
6.1.2 (3GS): iPhone2,1_6.1.2_10B146_Restore.ipsw
6.1.2 (4 GSM): iPhone3,1_6.1.2_10B146_Restore.ipsw
6.1.2 (4): iPhone3,2_6.1.2_10B146_Restore.ipsw
6.1.2 (4 CDMA): iPhone3,3_6.1.2_10B146_Restore.ipsw
6.1.2 (4S): iPhone4,1_6.1.2_10B146_Restore.ipsw
6.1.2 (5 GSM): iPhone5,1_6.1.2_10B146_Restore.ipsw
6.1.2 (5 GSM+CDMA): iPhone5,2_6.1.2_10B146_Restore.ipsw
6.1.3 (3GS): iPhone2,1_6.1.3_10B329_Restore.ipsw
6.1.3 (4 GSM): iPhone3,1_6.1.3_10B329_Restore.ipsw
6.1.3 (4): iPhone3,2_6.1.3_10B329_Restore.ipsw
6.1.3 (4 CDMA): iPhone3,3_6.1.3_10B329_Restore.ipsw
6.1.3 (4S): iPhone4,1_6.1.3_10B329_Restore.ipsw
6.1.3 (5 GSM): iPhone5,1_6.1.3_10B329_Restore.ipsw
6.1.3 (5 GSM+CDMA): iPhone5,2_6.1.3_10B329_Restore.ipsw
6.1.4 (5 GSM): iPhone5,1_6.1.4_10B350_Restore.ipsw
6.1.4 (5 GSM+CDMA): iPhone5,2_6.1.4_10B350_Restore.ipsw
7.0.0 (4 GSM): iPhone3,1_7.0_11A465_Restore.ipsw
7.0.0 (4 8GB): iPhone3,2_7.0_11A465_Restore.ipsw
7.0.0 (4 CDMA): iPhone3,3_7.0_11A465_Restore.ipsw
7.0.0 (4S): iPhone4,1_7.0_11A465_Restore.ipsw
7.0.0 (5 GSM): iPhone5,1_7.0_11A465_Restore.ipsw
7.0.0 (5 GSM+CDMA): iPhone5,2_7.0_11A465_Restore.ipsw
7.0.1 (5c GSM): iPhone5,3_7.0.1_11A470a_Restore.ipsw
7.0.1 (5c GSM+CDMA): iPhone5,4_7.0.1_11A470a_Restore.ipsw
7.0.1 (5s GSM): iPhone6,1_7.0.1_11A470a_Restore.ipsw
7.0.1 (5s GSM+CDMA): iPhone6,2_7.0.1_11A470a_Restore.ipsw
7.0.2 (4 GSM): iPhone3,1_7.0.2_11A501_Restore.ipsw
7.0.2 (4 8GB): iPhone3,2_7.0.2_11A501_Restore.ipsw
7.0.2 (4 CDMA): iPhone3,3_7.0.2_11A501_Restore.ipsw
7.0.2 (4S): iPhone4,1_7.0.2_11A501_Restore.ipsw
7.0.2 (5 GSM): iPhone5,1_7.0.2_11A501_Restore.ipsw
7.0.2 (5 GSM+CDMA): iPhone5,2_7.0.2_11A501_Restore.ipsw
7.0.2 (5c GSM): iPhone5,3_7.0.2_11A501_Restore.ipsw
7.0.2 (5c GSM+CDMA): iPhone5,4_7.0.2_11A501_Restore.ipsw
7.0.2 (5s GSM): iPhone6,1_7.0.2_11A501_Restore.ipsw
7.0.2 (5s GSM+CDMA): iPhone6,2_7.0.2_11A501_Restore.ipsw
7.0.3 (4 GSM): iPhone3,1_7.0.3_11B511_Restore.ipsw
7.0.3 (4 8GB): iPhone3,2_7.0.3_11B511_Restore.ipsw
7.0.3 (4 CDMA): iPhone3,3_7.0.3_11B511_Restore.ipsw
7.0.3 (4S): iPhone4,1_7.0.3_11B511_Restore.ipsw
7.0.3 (5 GSM): iPhone5,1_7.0.3_11B511_Restore.ipsw
7.0.3 (5 GSM+CDMA): iPhone5,2_7.0.3_11B511_Restore.ipsw
7.0.3 (5c GSM): iPhone5,3_7.0.3_11B511_Restore.ipsw
7.0.3 (5c GSM+CDMA): iPhone5,4_7.0.3_11B511_Restore.ipsw
7.0.3 (5s GSM): iPhone6,1_7.0.3_11B511_Restore.ipsw
7.0.3 (5s GSM+CDMA): iPhone6,2_7.0.3_11B511_Restore.ipsw
7.0.4 (4 GSM): iPhone3,1_7.0.4_11B554a_Restore.ipsw
7.0.4 (4 8GB): iPhone3,2_7.0.4_11B554a_Restore.ipsw
7.0.4 (4 CDMA): iPhone3,3_7.0.4_11B554a_Restore.ipsw
7.0.4 (4S): iPhone4,1_7.0.4_11B554a_Restore.ipsw
7.0.4 (5 GSM): iPhone5,1_7.0.4_11B554a_Restore.ipsw
7.0.4 (5 GSM+CDMA): iPhone5,2_7.0.4_11B554a_Restore.ipsw
7.0.4 (5c GSM): iPhone5,3_7.0.4_11B554a_Restore.ipsw
7.0.4 (5c GSM+CDMA): iPhone5,4_7.0.4_11B554a_Restore.ipsw
7.0.4 (5s GSM): iPhone6,1_7.0.4_11B554a_Restore.ipsw
7.0.4 (5s GSM+CDMA): iPhone6,2_7.0.4_11B554a_Restore.ipsw
Nokia 2710 Navigation Edition No Network Signal Solution
Heres the solution for Nokia 2710ne that have No network signal problem. This problem happens when the device suffered wet damaged or accidentally dropped.
For a water damaged Nokia 2710, you must ensure to clean the PCB board first before proceeding any software and hardware repair. And for accidentally dropped units like it shows a dropping signal indicator on the display, you may restore and or update the flash firmware first before you attempting hardware repair.
If the phone does not being fix through firmware restoration, you may then proceed to do a hardware check up and troubleshooting.
The solution below shows which particular components that may need to check, trace and or then replace if found damaged.
 Hints for repair:
Before you may proceed you must see to it that the antenna terminal contact expander were not damaged nor misaligned and it has a proper connection to the antenna module. A poor antenna connection also results to poor, dropping, and or no network signal receptions.
If the antenna connection is okay, you may then proceed to work on the RF Power Amplifier.
Check the RF PA chips supply voltage, this voltage is feed from the phones battery 3.7 volts.
If there is no voltage reading, trace its line paths through to the battery connector positive terminal. Just manage to apply jumper wire on it if the line is cut, fot it is the only option.
If the supply voltage is okay you may then remove the RF amplifier chip. Check all the solder bumps if there is already lifted or damaged. Install a new RF power amplifier. In most cases a damage RF Power Amplifier result to No Network Signal like on nokia 2710 navigation edition.
Read more »
For a water damaged Nokia 2710, you must ensure to clean the PCB board first before proceeding any software and hardware repair. And for accidentally dropped units like it shows a dropping signal indicator on the display, you may restore and or update the flash firmware first before you attempting hardware repair.
If the phone does not being fix through firmware restoration, you may then proceed to do a hardware check up and troubleshooting.
The solution below shows which particular components that may need to check, trace and or then replace if found damaged.
Nokia 2710 No Network Signal Problem
Before you may proceed you must see to it that the antenna terminal contact expander were not damaged nor misaligned and it has a proper connection to the antenna module. A poor antenna connection also results to poor, dropping, and or no network signal receptions.
If the antenna connection is okay, you may then proceed to work on the RF Power Amplifier.
Check the RF PA chips supply voltage, this voltage is feed from the phones battery 3.7 volts.
If there is no voltage reading, trace its line paths through to the battery connector positive terminal. Just manage to apply jumper wire on it if the line is cut, fot it is the only option.
If the supply voltage is okay you may then remove the RF amplifier chip. Check all the solder bumps if there is already lifted or damaged. Install a new RF power amplifier. In most cases a damage RF Power Amplifier result to No Network Signal like on nokia 2710 navigation edition.
Thursday, April 16, 2015
Nokia N78 keypad malfunction solution with keypad filter IC jumper ways solution
Heres a solution that may help fix and repair Nokia N78 keypad failure or malfunction. If you already tried to replace the keypad flex cable but the problem still exists, this solution below will show you the keypad filter IC that is being connected to eah particular keys within the keypad matrix.
 You may trace each particular line paths for deep keypad repair troubleshooting.
N78 Keypad Filter IC connection tracks
Nokia 111 Local Test Mode Problem Solution Jumper Solution
 some time we get test mode local problem in our mobile display and in this case we can not use cell Nokia 5250 Key Pad Lock is Not Working.
 phone keypad and other functions.if you have same problem then diagram bellow will help you to solve
this problem. In above diagram you can see a red line box to show the exact location of resistance
which is used in problem solution of test mode in nokia 111.
Once phone has been disassembled you can clean whole mother board for rust or carbon.Leave it to dry
and apply hot air.Replace indicated resistance and also check components behind battery terminals.
for more detail and new tips and tricks about cellphone service problem keep visiting this page we will update cellphone service diagrams timely with new cellphone diagrams.some related post are also given bellow you can read them also for more information about cellphone.
Nokia N97 Left and Right Ringer Hands Free Loud Speaker Solution
Heres the solution to those who are looking for a quick guide in repairing Nokia N97 left and right ringer, hands free loud speaker problem issues like there is no audio sound can be heard over it.
This solution can be applied if the device speaker is working okay but still there is no sound output can be heard on it. The solution below shows the Ringer or Loud Speaker Audio circuit. It indicates certain components that needs to be check and or replace if found faulty or damaged.
Check and ensure first that speaker is working or already tried installing a replacement spare on.
If the speakers were okay, you may then proceed to check those components showed on the solution above.
There are filter coils connected on the circuit, you may first check this components.
For the LEFT speaker problem , you may check that the flex cable is not damaged before trying to check or replace the filter coils. If all coils or inductors were okay, you may then try to rework or re-ball the audio amplifier chip or replaced it with a new one. If the audio IC is alredy replaced and all the filter coils were seems good, You may then suspect that the problem lies or power and audio IC (AVILMAS), reworking it might help solved and fix the problem.
This solution can be applied if the device speaker is working okay but still there is no sound output can be heard on it. The solution below shows the Ringer or Loud Speaker Audio circuit. It indicates certain components that needs to be check and or replace if found faulty or damaged.
Nokia N97 Left and Right Ringer Loud Speaker Repair Solution

Check and ensure first that speaker is working or already tried installing a replacement spare on.
If the speakers were okay, you may then proceed to check those components showed on the solution above.
There are filter coils connected on the circuit, you may first check this components.
For the LEFT speaker problem , you may check that the flex cable is not damaged before trying to check or replace the filter coils. If all coils or inductors were okay, you may then try to rework or re-ball the audio amplifier chip or replaced it with a new one. If the audio IC is alredy replaced and all the filter coils were seems good, You may then suspect that the problem lies or power and audio IC (AVILMAS), reworking it might help solved and fix the problem.
Wednesday, April 15, 2015
Nokia C2 07 MMC Memory Card Problem Solution Ways
if Nokia C2-07 MMC is not working or it do not accept memory card it can be cause of water damage and rust. It can be due to MMC jack and damage pins. And this problem can be reason of MMC I.C So lets check all these parts and try to Repair Memory card Problem in Nokia C2-07.Nokia 111 Ringer Problem Jumpers Ways Solution
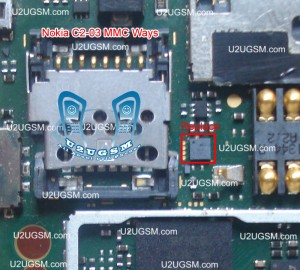
The above diagram have a red line to show you which parts are used in Memory Card function so check these parts and in first step try to clean them with electronics cleaner and apply some hot air to dry it.
Once it is dry check and if not working then replace this I.C to solve memory card problem in Nokia C2-07.
for more detail and new tips and tricks about cellphone service problem keep visiting this page we will update cellphone service diagrams timely with new cellphone diagrams.some related post are also given bellow you can read them also for more information about cellphone.
Read more »
The above diagram have a red line to show you which parts are used in Memory Card function so check these parts and in first step try to clean them with electronics cleaner and apply some hot air to dry it.
Once it is dry check and if not working then replace this I.C to solve memory card problem in Nokia C2-07.
for more detail and new tips and tricks about cellphone service problem keep visiting this page we will update cellphone service diagrams timely with new cellphone diagrams.some related post are also given bellow you can read them also for more information about cellphone.
Nokia X6 No Network Signal Reception problem solution hardware repair solution
Heres the solution that may help and guide to repair Nokia X6 having a No Network Signal reception. If ever tried to restore and update the device firmware but nothing happens, this solution shows the corresponding RF circuit of Nokia X6 PCB board that might something wrong, faulty or being damaged.
 Repair Tips:
1. Apply and supply voltage to the PCB board using desired DC regulated power supply voltage of 3.7 volts. Check the supply voltage from the cellphones battery through to the corresponding components highlighted in red color, these are battery supply voltage filter coils that being feeds to RF circuit components. IF there are no voltage readings on that areas, check the continuity of the battery positive terminal on that certain parts. Apply jumper if the line is cut or open. check also the filter coils and replace if found damaged.
2. Check and measure the secondary voltage output from the RF DC to DC converter chip highlighted in orange color. If there is no voltage readings on that spots, rework or replace the DC to DC converter IC.
3. Check or replace the Clock crystal oscillator. (VCTXO)
4. Rework or replace RF Power Ampilifier IC (PA)
5. Rework or replace Front End Module IC (FEM)
6. Rework or replace Radio Frequency IC (RF IC)
Nokia X6 No Network Signal problem solution
1. Apply and supply voltage to the PCB board using desired DC regulated power supply voltage of 3.7 volts. Check the supply voltage from the cellphones battery through to the corresponding components highlighted in red color, these are battery supply voltage filter coils that being feeds to RF circuit components. IF there are no voltage readings on that areas, check the continuity of the battery positive terminal on that certain parts. Apply jumper if the line is cut or open. check also the filter coils and replace if found damaged.
2. Check and measure the secondary voltage output from the RF DC to DC converter chip highlighted in orange color. If there is no voltage readings on that spots, rework or replace the DC to DC converter IC.
3. Check or replace the Clock crystal oscillator. (VCTXO)
4. Rework or replace RF Power Ampilifier IC (PA)
5. Rework or replace Front End Module IC (FEM)
6. Rework or replace Radio Frequency IC (RF IC)
Nokia C2 07 Lcd Display Problem Solution Ways Jumpers
Nokia C2-07 Blank Lcd Display, Nokia C2-07 White Lcd Display, Nokia C2-07 Lcd Jack Damage Prints Missing.Nokia 110 Not Charging Problem Solution Jumper Ways
To solve lcd display problem in Nokia C2-07 we have required a few tools and components.
Nokia screw Driver t5 and t4 for opening screw .
Lcd panel for Nokia C2-07
Electronics Cleaner for rust or water damage.
Hot air to dry the mother board.
Lcd Jack if we have to replace it.
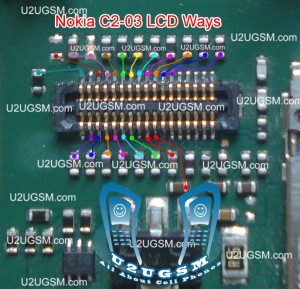
Diagnosting & Solution:
After disassemble of Nokia C2-07 remove lcd and check lcd jack and its near by area for rust or water damages.
If here is some carbon on parts or at lcd jack.
Apply electronics cleaner and dry it with hot air for a few mint.
Do not apply so much heat it can harm your skin and mother board parts also.
Check with Lcd and if it is still blank replace with new one.
It might be possible that lcd jack pins are missing or not getting connected with lcd so change it.
Check all these links as given in above diagram in different colors so that you can find them easily.
Warnings:
Do not apply to much heat it can damage the mother board.
Make sure mother board is dry proper when you apply electronics clean.
Check Lcd jack and when removing it make sure solder has been melt.
If solder has not proper melt and you try to remove lcd jack prints might be damage.
When you replace lcd make sure lcd strip is proper fixed.
It can be damage when you assemble the phone if not in proper place.
for more detail and new tips and tricks about cellphone service problem keep visiting this page we will update cellphone service diagrams timely with new cellphone diagrams.some related post are also given bellow you can read them also for more information about cellphone.
Read more »
To solve lcd display problem in Nokia C2-07 we have required a few tools and components.
Nokia screw Driver t5 and t4 for opening screw .
Lcd panel for Nokia C2-07
Electronics Cleaner for rust or water damage.
Hot air to dry the mother board.
Lcd Jack if we have to replace it.
Diagnosting & Solution:
After disassemble of Nokia C2-07 remove lcd and check lcd jack and its near by area for rust or water damages.
If here is some carbon on parts or at lcd jack.
Apply electronics cleaner and dry it with hot air for a few mint.
Do not apply so much heat it can harm your skin and mother board parts also.
Check with Lcd and if it is still blank replace with new one.
It might be possible that lcd jack pins are missing or not getting connected with lcd so change it.
Check all these links as given in above diagram in different colors so that you can find them easily.
Warnings:
Do not apply to much heat it can damage the mother board.
Make sure mother board is dry proper when you apply electronics clean.
Check Lcd jack and when removing it make sure solder has been melt.
If solder has not proper melt and you try to remove lcd jack prints might be damage.
When you replace lcd make sure lcd strip is proper fixed.
It can be damage when you assemble the phone if not in proper place.
for more detail and new tips and tricks about cellphone service problem keep visiting this page we will update cellphone service diagrams timely with new cellphone diagrams.some related post are also given bellow you can read them also for more information about cellphone.
Tuesday, April 14, 2015
Nokia X2 02 Speaker problem solution jumper ways
Nokia X2-02 speaker problem, Nokia X2-02 earpiece jumper ways, Nokia X2-02 mic is not working, Nokia X2-02 speaker jumpers, speaker is not working or low voice and noise.Nokia X2-02 Ringer problem solution ways

If Nokia X2-02 speaker has low voice or nosie it can be problem of speaker ear piece. If no voice in it that may can be cause of missing or damage parts. The noise can also be due to water damages in Nokia X2-02.
If speaker is not working or have a low voice it can be fault of speaker and housing. Check Nokia X2-02 housing ( body ). All housing have a small whole at the point of ear piece. In some cases rust or dust cover this point and the voice can not reach proper to the mic point so make it clean if there is some dust on it.
After disassambly of Nokia X2-02 look at the motherboard for rust carbon or burren parts. If you found some rust or carbon apply electronics cleaner on the mother board and apply hot air to make it dry proper.
Applying too much heat can damage the mother board and parts.It also can be harm for your skin.So keep in mind about normal heat flow when making it dry.
Check all these tracks that are provided in above diagram to solve speaker problem in Nokia X2-02. In diagram two different color lines are given to identify all parts that are used to solve Nokia X2-02 speaker problem with jumpers.
If some parts are missing or damage apply jumper on these points where small circles are pointing in nokia mic repairing diagram above.
Nokia Asha 203 MMC Memory card problem solution
Nookia Asha 203 MMC Problem, Nokia Asha 203 Memory Card Solution, Memory Card Not formatted, Memory Card Not detected problem solution in Nokia Asha 203. All these memory card problem solutions are possible by following diagrams that I am going to post in this post.nokia Asha 203 No Network Low Signal Problem Solution Jumpers

Replace memory card and check it again. If card is not formated make it formate with card settings from Nokia Asha 203 or formate the memmory card with computer.
After dis assambly of nokia asha 203 check the whole mother borad for water damages or carbon on it. If you find it clean mother board with electronics cleaner and apply hot air to make it dry.
Do not apply much heat it can damage the nokia sha 203 mother board or may can harm your skin also. Check red line Ic that is used for memory card function in Nokia Asha 203. Re sold it and re flow the IC. If resolding of the memory card IC can not solve MMC problem you have to replace thic MMC Ic in noki aasha 203.
for more detail and new tips and tricks about cellphone service problem keep visiting this page we will update cellphone service diagrams timely with new cellphone diagrams.some related post are also given bellow you can read them also for more information about cellphone.
Nokia C2 06 Ringer Problem Solution Jumper Ways
Nokia C2-06 ringer HF is not working, Nokia C2-06 Ringer Speaker is not working, Nokia C2-06 can not play music. We can not here voice during loud speaker in nokia c2-06.
Tools:-
Nokia key T4 and T5
Hot air.
Solding Iron.
Electronics Cleaner.
Nokia C2-06 Ringer,Nokia 2330 Classic Charger Not Responding or Not Supported
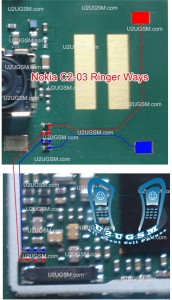
Diagnostic & Solutions:-
If Nokia C2-06 is not abble to ring a bell and we can not use loud speaker it might be fault of ringer or it may not be attached with mother board.
it can be damage or might be its not in proper location.It can be cause of Water damages and missing components,So lets solve the problem in a few simple steps as given in above diagram.
Disassemble Nokia C2-06 and check ringer points with electronics meter.If ringer shows good value then check point on the mother board and if the have also a good value it can be cause of miss fitting.
So assembly with proper placements and tight the screw and try it if not working then replace ringer with new one.If you find some prints missing then apply jumpers as given in above diagram. There are two different color lines Red and Blue.These lines indicates the negative and positive prints of ringer in Nokia C2-06 so apply these jumper to solve ringer problem in nokia C2-06
Warnings:-
Do not apply much heat with hot air it can damage the mother board and your skin.
Keep in mind about placement of ringer because it is not proper ringer will not work.
for more detail and new tips and tricks about cellphone service problem keep visiting this page we will update cellphone service diagrams timely with new cellphone diagrams.some related post are also given bellow you can read them also for more information about cellphone.
Tools:-
Nokia key T4 and T5
Hot air.
Solding Iron.
Electronics Cleaner.
Nokia C2-06 Ringer,Nokia 2330 Classic Charger Not Responding or Not Supported
Diagnostic & Solutions:-
If Nokia C2-06 is not abble to ring a bell and we can not use loud speaker it might be fault of ringer or it may not be attached with mother board.
it can be damage or might be its not in proper location.It can be cause of Water damages and missing components,So lets solve the problem in a few simple steps as given in above diagram.
Disassemble Nokia C2-06 and check ringer points with electronics meter.If ringer shows good value then check point on the mother board and if the have also a good value it can be cause of miss fitting.
So assembly with proper placements and tight the screw and try it if not working then replace ringer with new one.If you find some prints missing then apply jumpers as given in above diagram. There are two different color lines Red and Blue.These lines indicates the negative and positive prints of ringer in Nokia C2-06 so apply these jumper to solve ringer problem in nokia C2-06
Warnings:-
Do not apply much heat with hot air it can damage the mother board and your skin.
Keep in mind about placement of ringer because it is not proper ringer will not work.
for more detail and new tips and tricks about cellphone service problem keep visiting this page we will update cellphone service diagrams timely with new cellphone diagrams.some related post are also given bellow you can read them also for more information about cellphone.
Nokia C5 00 Keypad problem solution and IC Jumper
Nokia C5-00 keypad problem, Keypadnot working in Nokia c5-00, Keypad Ic ways, Keypad Ic Jumpers can be found in this post to solve keypad problems in Nokia C5-00.Look at diagram bellow and find these parts that are used in keypad work of Nokia C5-00.Nokia 2320 keypad is not working it can be cause of water damage or broken parts.In this problem

Clean these parts that are used in keypad function of Nokia c5-00 and apply heat with hot air to dry them. Do not apply much heat it can damage the motherboard and may can harm you skin.
you can check keypad strip and these ic’s and replace them to solve keypad fault in Nokia C5-00.
for more detail and new tips and tricks about cellphone service problem keep visiting this page we will update cellphone service diagrams timely with new cellphone diagrams.some related post are also given bellow you can read them also for more information about cellphone.
Monday, April 13, 2015
Nokia C5 00 Not Charging or Fake Charging Solution IC
Nokia C5 not charging problem, Charging Ic, Fake Charging. All these problem can be solve with a few basic steps that I am going to teach you here in this post.If you plugin charging pin into charging jack of Nokia C5-00 and it do not show any notification on screen and start charging also but do not full charge the battery it can be fault charging IC that is used in the mobile phone for charging.Nokia 2320 LCD display problem solution

So find them and clean these parts with electronics cleaner.So that if there is some rust or carbon that can be clean.Apply hot air to dry it and do not apply much because it can be harm for your skin.
Reslod these parts and re flow them can solve fake charging problem in Nokia C5-00. If it can not solve the issue then replace them to solve fake charging problem in the Nokia Mobile phone.
Nokia C5 00 Handfree IC Not working problem solution with jumpers
If you find a handfree problem in Nokia C5-00. Hand free open Handfree not dected problem it can be solve with a few easy steps that i will write in this post. A handfree repairing diagram is also attached with this post that will show you the main parts that are used in handfree function in Nokia C5-00.Nokia 2320 light problem solution keypad light lcd light

So once you have review the repairing diagram for Nokia C5-00 clean handfree jack and these parts that are identified in above diagram. Clean them with electronics cleaner and apply heat to dry the mother board.Do not apply much hot air because it can harm you skin and may can damage the mother board.
Remove the ic and apply jumpers as shown in section one of the diagram Then change the second part which is given in repairing diagram for handfree problem in Nokia c5-00.
for more detail and new tips and tricks about cellphone service problem keep visiting this page we will update cellphone service diagrams timely with new cellphone diagrams.some related post are also given bellow you can read them also for more information about cellphone.
Nokia Asha 200 MMC Memory Card Problem Solution Ways Jumpers
if Memory Card MMC is not working proper in nokia asha 200 or having fault inset Memory Card or Memory Card is not inserted etc problem then here is diagram Nokia C2-06 Ringer Problem Solution Jumper Ways 
that will help you to solve this issue all parts that are shown in diagram with blue lines and box are used in mmc function so resold these parts and if problem not solve then replace these parts it will help you to solve memory card problem in nokia asha 200.
for more detail and new tips and tricks about this problem keep visiting this page we will update it timely with new diagrams.some related post are also given bellow you can read them also for more information.
Sunday, April 12, 2015
Nokia 7230 No Network Signal Problem Solution
Heres a brief solution for Nokia 7230 No network signal problem. This solution shows the RF circuit on nokia 7230 that holds the radio signal during data transmission.
Please note before you may use this solution, first ensure that the device firmware is totally calibrated, successfully flashed or restored and upgraded or downgraded. This solution below covers only for hardware failure that may not or cant be fix by software or firmware.
The Nokia 7230 RF circuit components mounting is similar to Nokia X6. This solution below is from Nokia X6 board.
Just follow the instructions indicated on the solution above of which and where to start in troubleshooting proceedings. In most common cases the RF Power Amplifier breakdown may most often causes the problem.
Please note before you may use this solution, first ensure that the device firmware is totally calibrated, successfully flashed or restored and upgraded or downgraded. This solution below covers only for hardware failure that may not or cant be fix by software or firmware.
The Nokia 7230 RF circuit components mounting is similar to Nokia X6. This solution below is from Nokia X6 board.
Nokia 7230 No Network Signal Solution
Just follow the instructions indicated on the solution above of which and where to start in troubleshooting proceedings. In most common cases the RF Power Amplifier breakdown may most often causes the problem.
Infinity Box Nokia BEST v1 80 released XG223 Qiming project Flashing supported
Infinity-Box Nokia [BEST] v1.80 released
- USB flashing improved
- XG223 (Qiming project) Flashing released: Asha 500 and similar
- WP8x Flashing revised
GPG Dragon Android Box Firmware and Manual UPDATE VeR 1.65 Use Full Update Many Cpu Supported
- Service operations improved
XG223 (Qiming): RPL operations supported (Tick Xgold)
XG223 (Qiming): other service operations supported
- Navi Database updated
Included all latest Asha , WP8x , MTKx firmwares
Included "Lumia Black" (GDR3) update for some WP8x models
- Other
- Stuff Files updated
- Ini updated and revised
- Some BugFixes at all
Direct official download link:
http://www.infinity-best.com/downloa...BEST_v1.80.rar
Nokia C5 03 USB not charging Not detect problem solution jumpers
If Nokia C5-03 is not charging with usb or USB data cable can not detect. This problem can be cause of water damages carbon or burn. And may be due to usb jack damages.Nokia C5-03 MMC Memory Card Not working problem solution

After dis assemble of Nokia C5-03 look at mother board and If you found some rust carbon or water damages then it can also be cause of Nokia C5-03 USB problem to solve and fix USB problem in Nokia C5-03 clean all the rust and carbon with electronics cleaner and apply hot air to make it dry.
In above diagram some different color lines are given to identify paths and tracks that are used for usb charging and usb data transfer in Nokia C5-03.Check all these paths tracks and parts components with meter. If any of them is missing apply jumpers as given in diagram.
for more detail and new tips and tricks about cellphone service problem keep visiting this page we will update cellphone service diagrams timely with new cellphone diagrams.some related post are also given bellow you can read them also for more information about cellphone.
Saturday, April 11, 2015
Nokia C3 Not Charging solution charger no response problem solution
Heres the solution for Nokia C3 that does not show charging indications when the battery charger is being plug-in. This solution simply shows particular components that may need to check or replace if charging problem occurs.

The components showed on the solution above might get possibly damaged and causes the charging problem issues. Those components are made of filter coil, a diode and a resistors.
If already tried to check and replaced those certain components but the problem still exists you may need to rework the JUNO IC for further troubleshooting procedures.
Read more »
Nokia C3 Not Charging solution for charger no response problem
The components showed on the solution above might get possibly damaged and causes the charging problem issues. Those components are made of filter coil, a diode and a resistors.
If already tried to check and replaced those certain components but the problem still exists you may need to rework the JUNO IC for further troubleshooting procedures.
Nokia 2630 No Network Service Found Solution
Heres a revived solution for Nokia 2630 No network service found problem. This problem may happens if the device suffered water damaged and or heavily dropped. The solution below shows the Nokia 2630 RF (radio frequency) circuit. This holds as the transceivers of the data into the airwaves during transmission, and if this circuit will breakdown or being damaged it will result to NO NETWORK Signal problem issues.

Repair Tips:
Ensure that the device firmware is okay or successfully restored or flashed.
Try to upgrade into higher version and write a good PM files.
IF the firmware calibration already done but seems nothing happens you may proceed to trace, check or replace the corresponding components showed on the solution above. Make sure that the PCB board condition is still stable and not like bended or some damaged spots. Check also if there is oxidation build up, clean it first before you may proceed.
First check the PA supply voltage, this voltage is came from the battery B+ terminal and you can trace it between capacitors showed on the solution above.
If the voltage line paths is okay, try to replaced the PA (power amplifier).
Then if nothing happens, you may then try to rework or replaced the RF transceiver chip.
If all the chip is already been replaced but the problem still exists, try to replace the voltage controlled clock crystal oscillator.
Nokia 2630 No network service solution
Repair Tips:
Ensure that the device firmware is okay or successfully restored or flashed.
Try to upgrade into higher version and write a good PM files.
IF the firmware calibration already done but seems nothing happens you may proceed to trace, check or replace the corresponding components showed on the solution above. Make sure that the PCB board condition is still stable and not like bended or some damaged spots. Check also if there is oxidation build up, clean it first before you may proceed.
First check the PA supply voltage, this voltage is came from the battery B+ terminal and you can trace it between capacitors showed on the solution above.
If the voltage line paths is okay, try to replaced the PA (power amplifier).
Then if nothing happens, you may then try to rework or replaced the RF transceiver chip.
If all the chip is already been replaced but the problem still exists, try to replace the voltage controlled clock crystal oscillator.
nokia c2 00 light ways jumper solution display lights solution
Nokia C2-00 display light lcd light problem solution is available in this post a light repairing diagram is also attached with this post to solve nokia c2-00 lights problem lcd and display light problem dim lcd lights problem.nokia c1-02 light problem solution jumpers 100% Tested

In above diagram you can see some colorfull lines that are in red and blue colors. these lines are defining different tracks paths of components. these parts are used in light function in nokia c2-00.
check all these tracks with meter and if any of them is missing then apply these jumpers as given in above diagram to solve light problem solutions.
for more detail and new tips and tricks about cellphone service problem keep visiting this page we will update cellphone service diagrams timely with new cellphone diagrams.some related post are also given bellow you can read them also for more information about cellphone.
Read more »
In above diagram you can see some colorfull lines that are in red and blue colors. these lines are defining different tracks paths of components. these parts are used in light function in nokia c2-00.
check all these tracks with meter and if any of them is missing then apply these jumpers as given in above diagram to solve light problem solutions.
for more detail and new tips and tricks about cellphone service problem keep visiting this page we will update cellphone service diagrams timely with new cellphone diagrams.some related post are also given bellow you can read them also for more information about cellphone.
Nokia Asha 200 Charging Problem Solution Jumpers Ways
nokia asha 200 if it is not charging ok and you have not charging problem in nokia asha 200 then you can solve this problem with help of diagram bellow. in this diagram all charging links are identified so that you can understand which parts are used in charging function in nokia asha 200.Nokia 5800 insert sim problem solution tested

So one print is ground it is identified in diagram with blue color and red cooler is a positive print and you can check all track with meter and if any of them is broken you can apply jumper as defined in repairing diagram.mostly if we plug in charger and it does not show any thing it can be fault of charging base or may be fault of broken link. so check charging base also.
If it shows not charging indication or a message charger not supported then it can be fault of charging ic or may be due to 47k resistance. About these problems I will post in upcoming days.
for more detail and new tips and tricks about cellphone service problem keep visiting this page we will update cellphone service diagrams timely with new cellphone diagrams.some related post are also given bellow you can read them also for more information about cellphone.
Friday, April 10, 2015
Nokia C2 07 Mic Problem Solution Jumper Ways Microphone
 Nokia C2-07 Mic not working, Microphone is not working in Nokia C2-07, Voice is missing and can not reach to destination Mobile Phone, Mic problem, Microphone Solution in Nokia C2-07 Nokia 111 Mic Problem Jumpers Ways Solution
 Tools:-
Nokia T5 and T4 for disassemble.
Universal Microphone.
Electronics Cleaner.
Hot Air.
Electronics Meter.
Solding iron.
Diagnostics & Solutions:-
Before Disassemble of Nokia C2-07 make sure that mic whole in Cassing ( housing ) is opened. And here is not any dust in it. Disassemble the mobile phone and remove mic microphone from mother board with solding iron.
Check points on mother board with miter and if any value is missing check all these parts that are given in red and blue color in above diagram.If any of them is missing apply jumpers as described in above repairing picture.
Replace new mic and apply jumpers to its negative and positive points. On the mother board Red color line shows ground print and Blue line indicates positive print of mic. So this will help you to solve mic problem in nokia C2-07
Warnings:-
Apply solder on mic and Remove mic when it too hot so that mic print remain OK.
Don’t apply much heat with hot air it can damage the mother board.
Assemble with focus because if mic is not in its proper place voice will not reach to destination mobile. Or you will not be able to record voice in it.
for more detail and new tips and tricks about cellphone service problem keep visiting this page we will update cellphone service diagrams timely with new cellphone diagrams.some related post are also given bellow you can read them also for more information about cellphone.
Nokia 5250 MMC Memory Card Problem Solution Ways Jumpers
if Memory Card MMC is not working proper in Nokia 5250 or having fault inset Memory Card or Memory Card is not inserted etc problem then here is diagram Nokia Asha 200 Charging Problem Solution Jumpers Ways 
that will help you to solve this issue all parts that are shown in diagram with blue lines and box are used in mmc function so resold these parts and if problem not solve then replace these parts it will help you to solve memory card problem in Nokia 5250.
for more detail and new tips and tricks about this problem keep visiting this page we will update it timely with new diagrams.some related post are also given bellow you can read them also for more information.
Read more »
that will help you to solve this issue all parts that are shown in diagram with blue lines and box are used in mmc function so resold these parts and if problem not solve then replace these parts it will help you to solve memory card problem in Nokia 5250.
for more detail and new tips and tricks about this problem keep visiting this page we will update it timely with new diagrams.some related post are also given bellow you can read them also for more information.
Nokia N78 Earpiece Speaker No Sounds Repair solution
This solution show the two filter coils and ESD filters that needs to be check or by then replace if there is no audio sounds can be heard over the earpiece speaker On Nokia N78.
Ensure that the speaker is working fine before trying to check and replace those components showed on the solution picture.

Those components are composed of a chip filter coils and an ESD filter that looks like a resistor and mounted on the top left side of the PCB board.
Ensure that the speaker is working fine before trying to check and replace those components showed on the solution picture.
Nokia N78 Earpiece Speaker Problem Solution ( No audio sounds repair)
Those components are composed of a chip filter coils and an ESD filter that looks like a resistor and mounted on the top left side of the PCB board.
Nokia 3710 fold keypad flex membrane line connection ways and tracks solution
Heres the Nokia 3710 fold keypad flex membrane line connection ways and tracks that can be used to trace a certain keypad keys that stop responding or not working when being pressed. This solution can be helpful to trace if there is one or more particulars keys that does not work before trying to figure out the main PCB board components that holds the keypad connection like the keypad filter IC.
The solution below shows the navigation and alphanumeric keys connection between each other including the volume control buttons like the volume up and the volume down.

Each keys have a designated color code for easy tracing procedure. The outer and inner core where both have different connection with each other. Just refer to the solution above for tracking particular keys that is not working or having a problem. For further troubleshooting nokia 3710 fold keypad problem or if this solution already used or already tried installing a new keypad flex matrix but the problem still exists see the Nokia keypad filter IC jumper ways tracks solution
Read more »
The solution below shows the navigation and alphanumeric keys connection between each other including the volume control buttons like the volume up and the volume down.
Nokia 3710 fold keypad matrix line connection ways and tracks
Each keys have a designated color code for easy tracing procedure. The outer and inner core where both have different connection with each other. Just refer to the solution above for tracking particular keys that is not working or having a problem. For further troubleshooting nokia 3710 fold keypad problem or if this solution already used or already tried installing a new keypad flex matrix but the problem still exists see the Nokia keypad filter IC jumper ways tracks solution
Thursday, April 9, 2015
Nokia 5230 Not Charging solution no response problem solution
if we plug in charger into Nokia 5230 charging jack and it shows not charging instead of saving charging.it can be fault of charging jack or may be due to some parts.some time it can be cause of charger.so in first step replace charger and if problem will not solve then dis assemble mobile phone.Nokia 5250 Speaker Ere Peace Not Working Problem Solution Jumpers

check whole board for rust carbon or water damage clean mother board and apply hot air so that it can be dry complete.positive link is shown with red line and green is to define ground.ground can be jumper with any ground point while in positive path you can check all parts and links if any link is not working apply jumper and if it is needed then replace parts those are missing or damage.
for more detail and new tips and tricks about cellphone service problem keep visiting this page we will update cellphone service diagrams timely with new cellphone diagrams.some related post are also given bellow you can read them also for more information about cellphone.
Miracle Box 1 71 Update Discussion Happy New Year Gift for Miracle Eagle Eye User
For Miracle & Eagle Eye User We release Miracle GsmCocktail with Miracle Edition
Miracle GsmCocktail Miracle Box Edition Include Pack 1
HTC/BB/SAMSUNG/HUWAI/XPERIA
Scheme Valid for Stock Available
Miracle GsmCocktail Miracle Box Edition Include Pack 1
HTC/BB/SAMSUNG/HUWAI/XPERIA
Scheme Valid for Stock Available
GPGDragon V3.39 New Year Update 2014 has been just Released see and enjoy it

Nokia Asha 202 Lcd display problem solution with jumpers
Nokia asha 202 display problem, nokia asha 202 lcd solution, nokia white display problem, nokia blank lcd solution. All these problems can be solve with tips and tricks that are given in this post bellow. A lcd display repairing diagram is also attached with this post.Nokia C5-03 Volume Keypad Lock keys not working Solution

After dis assembly of nokia asha 202 replace LCD and check the display. If replacement of LCD can not solve display problem in nokia asha 202 you can check water damages in the mother board.
If mother board is wet or having water damages and carbon on it. Clean the nokia asha 202 mother board with electronics cleaner and apply hot air to make it dry. Do not apply much heat it can be dangerous for you skin or can damage the mother board of nokia asha 202.
Lcd display jumpers are given in different colors in above display repairing diagram of nokia asha 202. Check these lcd display repairing tracks and if any of them is missing apply these jummpers to solve display problem in nokia asha 202.
for more detail and new tips and tricks about cellphone service problem keep visiting this page we will update cellphone service diagrams timely with new cellphone diagrams.some related post are also given bellow you can read them also for more information about cellphone.
Wednesday, April 8, 2015
Nokia 5220XM Ringer Hands Free Loud Speaker No Sound Solution
Heres the solution for Nokia 5220 Xpressmusic Ringer and Integrated Hands Free (IHF) Speaker that No sounds output can be heard on it.
If ever encountered this problem, you need to check the earpiece speaker first if it already busted or damaged.
If the speaker is working okay but still there is no audio sound output can be heard when being activated, you may use this solution below to trace the line paths and check particular components on Nokia 5220 PCB board that holds the IHF speaker circuit. This solution covered for left and right channel speakers connection.
 The IHF speaker left and right audio signal is feed from the power and audio IC (AVILMA) then filtered by a non polar capacitors before it feeds to the audio amplifier IC. The audio amplifier chip is the one that boosts or amplify the audio signals to make it sounds louder and better.
The boosted or amplified audio signal is then feeds across to a filter coils, bypass capacitors and an ESD protection resistors before it get through to the IHF Speakers.
Hints for Troubleshooting:
a) check the earpiece speaker first by using a multimeter.
b) clean the speaker terminals and contact pads.
c) check or replace the filter capacitors, filter coils and resistors if found damaged.
d) check the corresponding line paths of each corresponding connections
e) if all line paths and components is okay: Rework the audio amplifier IC or replace if it doesnt work.
f) If all of the above is already been done but does not solved the problem, You may then proceed to rework the audio IC.Trace the line paths to each corresponding solder ball bumps that holds for the IHF audio signals before in-placing it back.
Read more »
If ever encountered this problem, you need to check the earpiece speaker first if it already busted or damaged.
If the speaker is working okay but still there is no audio sound output can be heard when being activated, you may use this solution below to trace the line paths and check particular components on Nokia 5220 PCB board that holds the IHF speaker circuit. This solution covered for left and right channel speakers connection.
Nokia 5220 Xpressmusic Ringer and Hands Free Speaker No Sound Repair Solution
The boosted or amplified audio signal is then feeds across to a filter coils, bypass capacitors and an ESD protection resistors before it get through to the IHF Speakers.
Hints for Troubleshooting:
a) check the earpiece speaker first by using a multimeter.
b) clean the speaker terminals and contact pads.
c) check or replace the filter capacitors, filter coils and resistors if found damaged.
d) check the corresponding line paths of each corresponding connections
e) if all line paths and components is okay: Rework the audio amplifier IC or replace if it doesnt work.
f) If all of the above is already been done but does not solved the problem, You may then proceed to rework the audio IC.Trace the line paths to each corresponding solder ball bumps that holds for the IHF audio signals before in-placing it back.
Nokia 5233 insert sim problem solution tested
if you have insert sim problem in Nokia 5233 then it can be solve with a few steps that are written in this post.look at the diagram bellow and follow few steps that are givenin it.in case of insert sim problem, no sim, invalid sim.Nokia asha 200 Battery Terminal Points Damage Ways Problem Solution

in first step check sim pints in mobile may be they are damage or corbon on it.then rub it and check.if problem can not be solved then after dis assambly of Nokia 5233 check all parts that are shown in above diagram and also check all tracks.
all path are defined with different colors so that you can easily find out them.and replace them or apply jumpers to solve Nokia 5233 insert sim problem solution.
for more detail and new tips and tricks about cellphone service problem keep visiting this page we will update cellphone service diagrams timely with new cellphone diagrams.some related post are also given bellow you can read them also for more information about cellphone.
Miracle Eagle Eye Update Ver 1 68 Discussion Thread

How To Connect Mstar Clip To Volcano Box Workin Guide
Please if You Like Our Update Just Press Thanks Button Dont Write Any Thing Thanks / Good Update here see this file some model supported this update version see this version and download now
Here Download Link
Here Download Link
Tuesday, April 7, 2015
Samsung Galaxy S3 Mini Value Edition GT I8200L How to Install I8200LUBUANB2 Android 4 2 2 Jelly Bean Firmware
Samsung Galaxy S3 Mini (Value Edition) GT-I8200L- How to Install I8200LUBUANB2 Android 4.2.2 Jelly Bean Firmware,I8200LUBUANB2 Android 4.2.2 Jelly Bean Firmware Last Updated on 27-Feb-2014. Samsung Galaxy S3 Mini (Value Edition) GT-I8200L recently received the UBUANB2 Android 4.2.2 Jelly Bean official firmware update. Samsung started rolling out an OTA update about the firmware. The latest firmware build version is I8200LUBUANB2. The device recently released by Samsung and already get firmware update. This is the latest available official firmware for the device. If you wish to update your device with this latest firmware, then you can now update the same using our simple tutorial below. The below guide will help you to download and install the I8200LUBUANB2 Android 4.2.2 Jelly Bean Firmware manually through Odin. You can also check latest available firmware for your device through OTA (over the air) from Settings-About Phone-Software Update.

As the Galaxy S3 Mini I8200L released with Android 4.2.2 Jelly Bean, you can only expect few bug fixes and performance enhancement with this latest firmware update.
So, want to update your Galaxy S3 Mini I8200L to the latest UBUANB2 Android 4.2.2 Jelly Bean firmware? To install in official way, either you can go for OTA update as mentioned above or download firmware through the Samsung Kies utility. However, most of us prefer manual way to update official firmware. So, in this article you’ll find step by step manual guide to update the latest Android 4.2.2 UBUANB2 firmware on your Galaxy S3 Mini I8200L through Odin.
Important Note:
Android 4.2.2 Jelly Bean I8200LUBUANB2 Official Firmware Download List“The firmware is released only for the Samsung Galaxy S3 Mini GT-I8200L model, so don’t try this in any other android device. Check your device model number from Settings-About Phone. Also the tutorial is based on Windows PC. Follow all the pre-requisites, procedures and steps carefully to avoid breaking your phone”.
Samsung rolled out the firmware for the following countries. The firmware which are unbranded or not locked to any carrier, no matter of which country or region, can be flashed on any Galaxy S3 Mini GT-I8200L model.
Brazil: ZTO-I8200LUBUANB2-20140227172114.zip
[Firmware for rest of the countries and carrier will be added here when available]
Previous Firmware Build:
Previous Firmware Build:
I8200LUBUANA4 Android 4.2.2 Jelly Bean Firmware For Galaxy S3 Mini (Value Edition) GT-I8200L- How to Install
Pre-Requisites:
- Check battery percentage, your device should have at least 60% battery power
- Turn on USB Debugging mode, go to Settings-Developer Options-USB Debugging
- Backup important data and settings to external storage- follow this guide
- Install USB driver for your device on your computer- Download Samsung USB Driver
Points to be noted:
All the above pre-requisites are very important and must follow before proceed to installation guide. Hope you get all the above points. Now, go through the below tutorial to install Android 4.2.2 I8200LUBUANB2 official firmware on Galaxy S3 Mini I8200L.- If you are using any Custom ROM such as- CyanogenMod, Paranoid Android, AOKP, SLIM ROMs etc, then it’ll replaced by this official Stock ROM
- Custom Recovery (CWM or TWRP Recovery) will be replaced by Stock Recovery
- After flashing official firmware, your device will no longer belongs to rooted device. However you can root your device any time after flashing the firmware.
How to Install Android 4.2.2 Jelly Bean Official Firmware on Galaxy S3 Mini I8200L through Odin:

- Download Android 4.2.2 UBUANB2 Firmware for Galaxy S3 Mini I8200L from the above list
- Download Odin 3.09
- Switch off your phone and boot Galaxy S3 Mini I8200L into Download Mode by pressing and holding the Volume Down+Home+Power buttons (long press until the boot screen appear), now press Volume Up key to proceed to Download Mode.
- Extract the downloaded Odin3.09 zip file and run the Odin3 v3.09.exe file as an administrator (Right click on the .exe file and click on Run as administrator)
- Now connect your Galaxy S3 Mini I8200L to your computer via USB cable
- In Odin3 screen, you should see a COM Port number like “0:[COM7]” at ID:COM section and “Added!” text at the message box. This means your device has been detected by Odin3.
- Make sure that, only the “Auto Reboot” and “F. Reset Time” options are checked.
- Now, extract the downloaded firmware zip file, you’ll find a firmware file with extension .tar.md5
- In Odin screen, click on AP button and select the firmware file with .tar.md5 extension (The firmware file look something like: I8200LXXDLJ5_I8200LODDDLI7_INU.tar.md5)
- Now, click on the Start button to begin the installation process, wait few moments.
- Once completed, you would see “PASS!” message in ID:COM port having green background
- Your phone should automatically reboot after completion
- You can now disconnect your phone from computer
- Finish
Congrats! you have finish the tutorial to update Android 4.2.2 Jelly Bean official firmware on Galaxy S3 Mini GT-I8200L. Hope you successfully done the update process. If you followed everything as mentioned above, then your your Galaxy S3 Mini should now running on the latest Android 4.2.2 Jelly Bean build version UBUANB2. You can confirm the firmware update details from Settings-About Phone. If you stuck in any point or find any issue with the download link, the feel free to contact with us using the comment form below.
Nokia Asha 300 Power button On Off Switch Ways Jumpers Dead Problem Solution
Some time nokia asha 300 can be dead due to on off button problem. If on off button is not working in nokia asha 300 then it can not power on. So to solve this problem we have to follow a few steps that are given bellow and have to follow diagram bellow also.All cellular mobile repair solution see Nokia C2-01 Bluetooth Fm Radio is Not Working Solution
Nokia Asha 300 Power button On Off Switch Ways Jumpers Dead Problem Solution To check that it is button fault we can make a simple test plug in charger and check is it working in off mode if you can see nokia asha 300 is charging ok in off mode then it means set is not totally dead. And problem is only that mobile can not become power on.
So remove key pad striker and check is there any rust carbon or water damage on off button if yes clean it and change the push of button. Check links with meter and if on off button does not show value outer is a ground you can apply jumper on any ground print. While inner is a positive print and going to resistance back of mother board. Apply jumper as shown in diagram in red color.
for more detail and new tips and tricks about cellphone service problem keep visiting this page we will update cellphone service diagrams timely with new cellphone diagrams.some related post are also given bellow you can read them also for more information about cellphone.
Samsung Galaxy Note 3 SM N900 Simple Tutorial How To Root N900UBUDNB2 Android 4 4 2 KitKat Firmware
Samsung Galaxy Note 3 SM-N900- Simple Tutorial How To Root N900UBUDNB2 Android 4.4.2 KitKat Firmware,A simple method to root N900UBUDNB2 Android 4.4.2 KitKat Firmware is now available at NasirTech. Samsung Galaxy Note 3 SM-N900 recently get updated to the N900UBUDNB2 4.4.2 KitKat Firmware. If you yet to update the firmware, then update the same by following the above link. Hope you updated this latest firmware on your device and now you can root the UBUDNB2 firmware using our simple tutorial below. The below guide will help you to root N900UBUDNB2 4.4.2 KitKat Firmware running on Galaxy Note 3 SM-N900. Continue reading the tutorial for complete guide.
After updating official firmware, your device no longer belongs to rooted device. So, after official firmware update, many of us prefer to root our device to enjoy some additional features that unrooted android device doesn’t offer. With a rooted android device, you can install apps that ask root permission, flash various custom ROMs, install MODs and tweak various features. Root removes default bloatware apps that free-up lots of memory space and extend the battery life. However, once rooted, manufacturer warranty will be void. But you can regain the warranty by following proper unroot process. To know more about benefits of rooting android device, read- Complete Note on What is Rooting and Benefits of Rooting Android Phone.
 So, want to root Galaxy Note 3 SM-N900 Running N900UBUDNB2 4.4.2 KitKat Firmware? Continue reading this page to get all the necessary steps to successfully root your device. The root file (CF-Auto-Root) we used in this tutorial is safe and have nearly 100% success rate. We’ll use Odin software to flash the root file.
The tutorial is made with simple step by step guide, so that even an android newbie user can follow and successfully root his/her device. However, in this process you may loss your personal data and settings. So, we recommend you to follow all the backup instructions before proceed to rooting guide.

After updating official firmware, your device no longer belongs to rooted device. So, after official firmware update, many of us prefer to root our device to enjoy some additional features that unrooted android device doesn’t offer. With a rooted android device, you can install apps that ask root permission, flash various custom ROMs, install MODs and tweak various features. Root removes default bloatware apps that free-up lots of memory space and extend the battery life. However, once rooted, manufacturer warranty will be void. But you can regain the warranty by following proper unroot process. To know more about benefits of rooting android device, read- Complete Note on What is Rooting and Benefits of Rooting Android Phone.
The tutorial is made with simple step by step guide, so that even an android newbie user can follow and successfully root his/her device. However, in this process you may loss your personal data and settings. So, we recommend you to follow all the backup instructions before proceed to rooting guide.
Warning!
- This rooting tutorial is only applicable for Samsung Galaxy Note 3 SM-N900 model (ha3g). So, don’t try this in any other android device. Check your device model number from- Settings-About Phone.
- Rooting voids your phone’s manufacturer warranty. However, you can get back the warranty anytime by following proper unroot process or by flashing official firmware.
- This guide is for educational purpose and you should try this at your own risk. We are not responsible if your device experience a soft brick after following this tutorial.
Pre-Requisites:
- Check battery percentage, charge your device to a decent level of at least 60% battery power. Your device should not turn off during installation.
- Turn on USB Debugging mode, go to Settings-Developer Options-USB Debugging
- Backup important data and settings to external storage- follow this guide
- Install USB driver for your device on your computer- Download Samsung USB Driver
All the above pre-requisites are very important and must be followed before proceed to installation guide. Hope you get all the above points and done as mentioned. Now, you are ready to move to the final step of this tutorial where we have arranged a step by step details guide to root Galaxy Note 3 SM-N900 running N900UBUDNB2 4.4.2 KitKat firmware.
Steps to Root Galaxy Note 3 SM-N900 Running N900UBUDNB2 4.4.2 KitKat through Odin:
- Download CF-Auto-Root for Galaxy Note 3 N900 and extract the Zip file: CF-Auto-Root-t03g-t03gxx-gtN900.zip
- Download Odin 3.09 and extract the Zip file: Odin3_V3.09.Zip
- Now, Switch off your phone and boot Galaxy Note 3 N900 into Download Mode by pressing and holding the Volume Down+Home+Power buttons together (long press until the boot screen appear), now press Volume Up key to proceed to Download Mode.
- Run the Odin3 v3.09.exe file as an administrator (Right click on the .exe file and click on Run as administrator)
- Now connect your Galaxy Note 3 N900 to your computer via USB cable
- In Odin3 screen, you should see a COM Port number like “0:[COM7]” at ID:COM section and “Added!” text at the message box. This means your device has been detected by Odin3.
- Make sure that, only the “Auto Reboot” and “F. Reset Time” options are checked.
- Now, click on the AP button and select the CF-Auto-Root-t03g-t03gxx-gtN900.tar.md5 file.
- Finally, click on the Start button to begin the rooting process, wait few moments.
- Once completed, you would see “PASS!” message in ID:COM port having green background
- Your phone should automatically reboot after completion
- You can now disconnect your phone from computer
- Finish
Congrats! You have completed the tutorial to root Galaxy Note 3 N900 running N900UBUDNB2 4.4.2 KitKat Firmware. Hope you successfully done the rooting process. If you followed everything as mentioned in the above tutorial, then your Galaxy Note 3 N900 should now rooted and you have complete control over your device. Now, install apps that ask root permission or flash various custom ROMs. To verify your device is rooted or not, you can download and run the Root Checker App from Google Play Store. If you have any doubt or query about the tutorial, feel free to contact with us using the comment form below, and share your rooting experience with us.
Nokia Asha 300 Ringer Problem Solution jumpers
Nokia Asha 300 ringer problem can be solve with a few steps that are given in diagram bellow so look at diagram bellow to solve love ringer voice, no ringer tones, no ringer working problems in nokia asha 300.in diagram there are two colors blue and red both colors are defining path of circuit in mobile phone.Nokia 2320 Classic Mic Problem Solution Jumper Ways see All cellular mobile repair solution

Check ringer and if ringer do not show continuity or a good value with meter then change ringer with new one. Check points on board where ringer have to attaché after put in casing housing.
Then check all these paths as shown in diagram above and if any of them is broken or missing components then apply jumpers as described above. Small circle shows positions where we are able to make jumpers. in these place we can apply jumpers to solve ringer problem in nokia asha 300.
for more detail and new tips and tricks about cellphone service problem keep visiting this page we will update cellphone service diagrams timely with new cellphone diagrams.some related post are also given bellow you can read them also for more information about cellphone.
Monday, April 6, 2015
Nokia Lumia 800 No Network Low Signals Problems Solution
Nokia Lumia 800 No Network Low Signals Problems Solution is possible with a few steps that I am going to write in this post.In diagram bellow you can see red lines around Ic and a capacitor.Nokia Asha 311 Mic Problem Jumpers Ways Solution

Clean these parts with electronics cleaner and apply hot air so that it can be dry. Re sold Ic and Check Vreg voltage on the capacitor.
Clean these parts with electronics cleaner and apply hot air so that it can be dry. Re sold Ic and Check Vreg voltage on the capacitor.
Nokia 111 Local Test Mode Problem Solution Jumper Solution
some time we get test mode local problem in our mobile display and in this case we can not use cell Nokia 2323 Classic Insert sim problem solution ways jumper phone keypad and other functions.if you have same problem then diagram bellow will help you to solve
this problem. In above diagram you can see a red line box to show the exact location of resistance
which is used in problem solution of test mode in nokia 111.
Once phone has been disassembled you can clean whole mother board for rust or carbon.Leave it to dry
and apply hot air.Replace indicated resistance and also check components behind battery terminals.
for more detail and new tips and tricks about cellphone service problem keep visiting this page we will update cellphone service diagrams timely with new cellphone diagrams.some related post are also given bellow you can read them also for more information about cellphone.
Nokia C5 06 Insert Sim problem solution
Nokia C5-06 insert sim problem, Sim not valid in Nokia C5-06, Sim card problem. All these problems can be solve with this diagram that is given bellow in this post to solve Nokia C5-06 insert sim problem.
nokia Asha 202 keypad problem solution with IC

In above diagram red color line is identifying an IC that is used in sim function.After dis assembly of Nokia C5-06 check this IC and its near by area.
If you found some rust carbon or water damages then it can also be cause of Nokia C5-06 insert sim problem to solve and fix insert sim problem in Nokia C5-06 clean all the rust and carbon with electronics cleaner and apply hot air to make it dry.
Re sold or Re flow this Ic and if resolding can not solve insert sim problem in Nokia C5-06 then replace this IC.
for more detail and new tips and tricks about cellphone service problem keep visiting this page we will update cellphone service diagrams timely with new cellphone diagrams.some related post are also given bellow you can read them also for more information about cellphone.
Read more »
nokia Asha 202 keypad problem solution with IC
In above diagram red color line is identifying an IC that is used in sim function.After dis assembly of Nokia C5-06 check this IC and its near by area.
If you found some rust carbon or water damages then it can also be cause of Nokia C5-06 insert sim problem to solve and fix insert sim problem in Nokia C5-06 clean all the rust and carbon with electronics cleaner and apply hot air to make it dry.
Re sold or Re flow this Ic and if resolding can not solve insert sim problem in Nokia C5-06 then replace this IC.
for more detail and new tips and tricks about cellphone service problem keep visiting this page we will update cellphone service diagrams timely with new cellphone diagrams.some related post are also given bellow you can read them also for more information about cellphone.
Sunday, April 5, 2015
iCloud activation by pass 100 working Try this way
iCloud activation by pass 100% working Try this way,omplete iCloud activation bypass. This works as long as you follow all of directions and have the correct files . I know many doubted but here is partial proof in the pudding, you can follow this tutorial now and bring your iPhone back to life. The greatest thing of all here is that you can add your own iCloud credentials and totally reclaim the iPhone as yours. In addition, iTunes detects the phone as activated and so does evasi0n which means you can also jailbreak your device freely.
This is fantastic news for a lot of us and I really hope it help you all, but our work has only just began, please sign up and contribute to the site guys. Post comments articles and suggestions it would be greatly appreciated.iPhone 5c iPhone 5s 7.0.5 Update Firmware.
The video below should explain everything and will guide you step by step a more extensive written tutorial will be posted soon.
In the mean time here is a quick written tutorial.
- Put device into DFU mode
- Run ssh.jar wait until it says successful
- Open winSCP
- Open a new connection
- Host name: 127.0.0.1
- Port: 2022
- Login: root
- Password: alpine
- Press the terminal button in winSCP and type: mount.sh
- Go to /mnt1/var/Applications and right click and delete setup.app
- To activate your device and have it work with your mobile carrier, iTunes and Evasi0n copy the supplied files into the specified folders in the video.
- Reboot your device
- Your device will now be in recovery mode, Use Tiny Umbrella to kick it out of recovery as specified .

The files needed to achieve this can be obtained directly from GadgetWide by clicking on the link below. The fie is a single zip file which contains all of the files required and should be fairly simple. We will also post it in the GadgetWide download section.
Download iCloud Bypass Patch NOW
Subscribe to:
Comments (Atom)